


Media wall photography means photographing guests, speakers or VIPs in front of a branded backdrop so every picture carries the logo and is clean enough to publish. Four things do most of the work: a matte fabric wall, soft light set at an angle, a marked spot for people to stand on, and a test shot before the doors open.
If you're organising a launch or an awards night, the honest news is that the wall itself is rarely the problem. A well-printed backdrop in a badly planned room still gives you average pictures. Below we go through the planning, the light, the layout and the settings we'd start from — and what to do when it goes wrong.
What is a media wall, and is it the same as a step and repeat?
Search for "media wall" and you'll mostly find TV feature walls for living rooms. That's a different job. Here we mean the event kind: a branded backdrop that attendees are photographed and interviewed in front of, often at red-carpet style events, and also known as a press wall or step-and-repeat banner.
Most of the names describe use or artwork rather than different hardware. A London display specialist points out that the same stretch-fabric display gets called a media wall, press wall, photo wall, backdrop or step and repeat, depending on who's talking.
"Step and repeat" itself has two meanings, and it helps to know both:
- The pattern. Logos printed in a repeating grid so one appears in every frame, whatever the crop — the standard set-up for press conferences, trade shows and corporate events.
- The routine. Someone steps up, gets photographed, moves off, and the next person repeats it.
So the wall is the object, and step and repeat is both its usual pattern and the way people flow past it. If you're planning one, you're planning both.
How do you design a media wall that photographs well?
Most of what goes wrong in media wall pictures is decided before anyone picks up a camera. Artwork designed to look good on a proof sheet isn't the same as artwork designed for a lens.
Pick a matte fabric
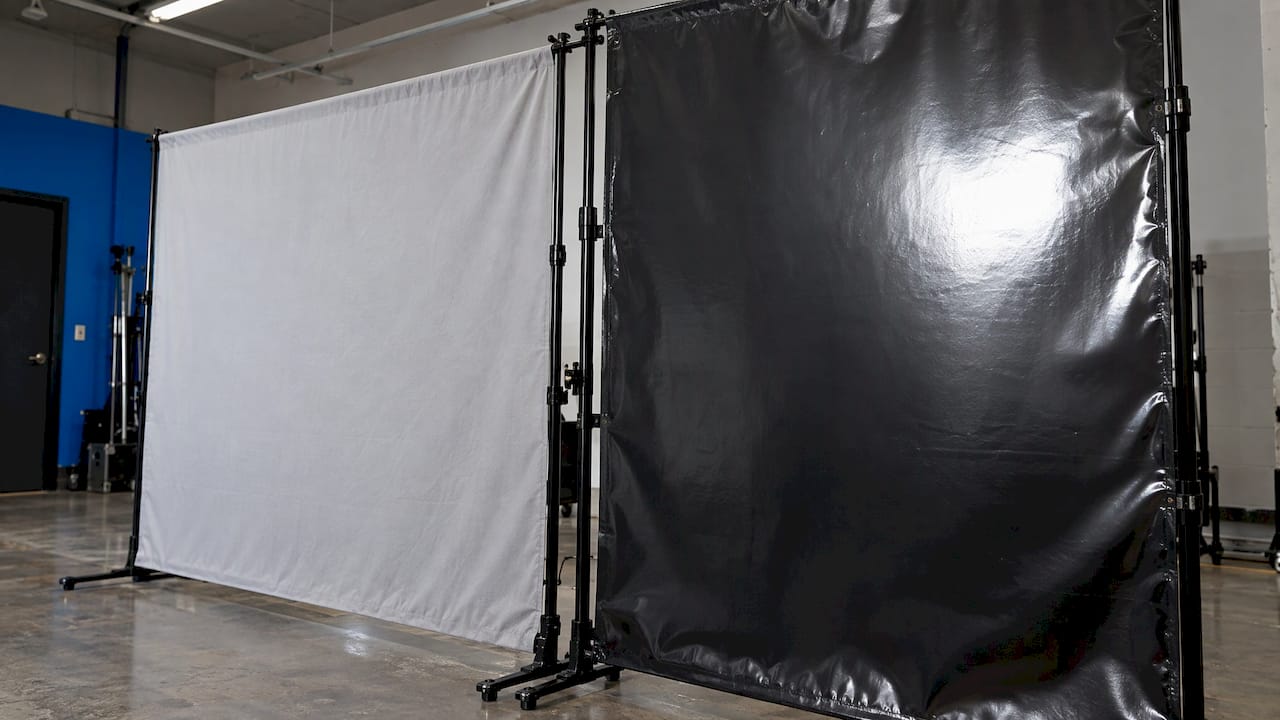
Tension polyester is widely treated as the go-to material for photo backdrops, because the weave diffuses flash and keeps hot spots down. A UK printer makes the same point from the photo and film side: fabric gives a crease-free, matte, light-friendly surface. Glossy vinyl and laminated banners are the usual cause of those white blotches where flash bounces straight back into the lens.
Get the size and height right
A typical tension-fabric wall is a lightweight aluminium frame with a seamless graphic. One UK system comes in widths from 2m to 6m, standing 2380mm tall. That's fine for individuals and couples, but with tall guests or a raised camera, check the top edge won't creep into the frame.
For width, we work on roughly 60cm (2 feet) per person. A group of four needs about 2.4m of fabric, or whoever's on the end ends up standing in front of a wall of nothing. It's also worth sizing the wall around group size, camera distance, ceiling height and floor space, and thinking about where guests will approach from.
Design the artwork for the camera
- Leave room above heads. Keep a clean, logo-light band of 20 to 30cm where heads usually fall, so nothing bright sits right behind a face.
- Size logos for the shooting distance. Plan the design around sight lines, entry points and expected camera angles, and scale the logos to how far back the camera will be.
- Go matte everywhere. Matte finishes cut glare; gloss invites it.
- Keep the pattern calm. A dense, high-contrast grid fights with hair and clothing. Generous spacing keeps the faces in charge.
How should you light a media wall?
You're lighting two things at once: the person and the wall. Light only the person and the wall goes dull; light only the wall and the person looks flat or shiny. The trick is to treat them separately.
Light the people first
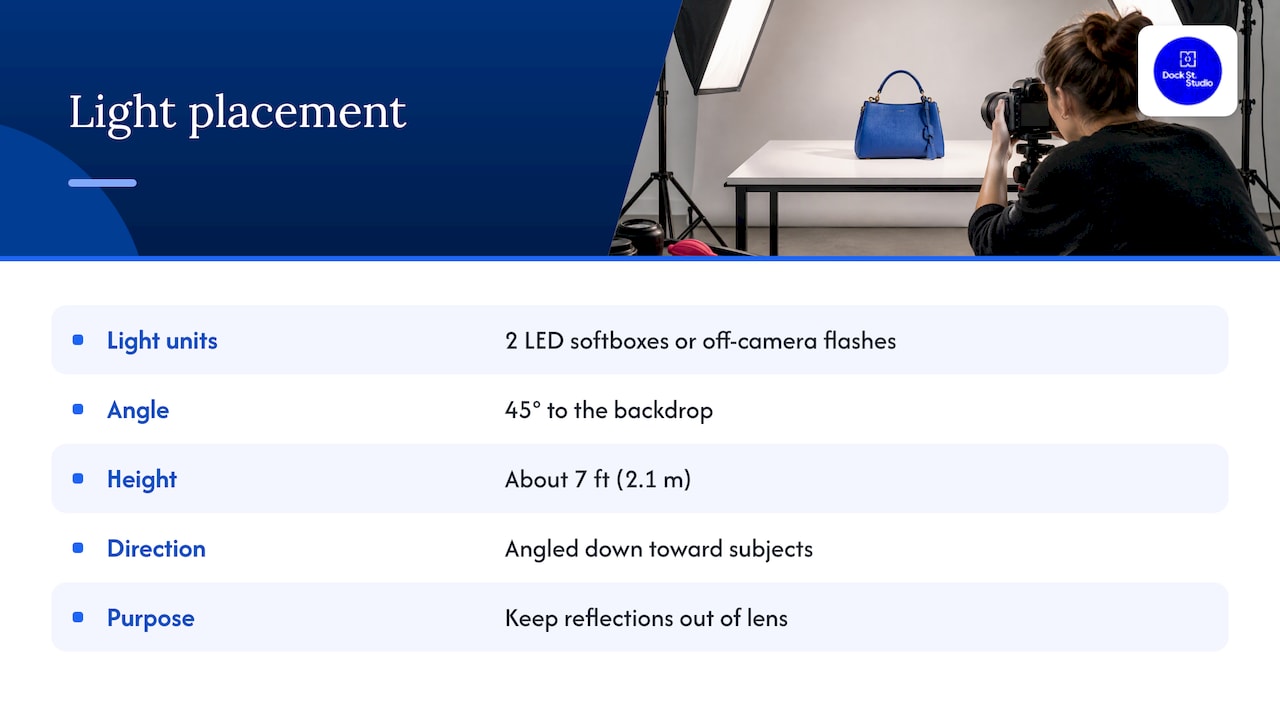
A good starting point is two softboxes or off-camera flashes at about 45 degrees to the backdrop, raised to roughly 2.1m and angled down at the subjects. Coming in from the side keeps reflections from bouncing straight back into the lens, which is the whole reason to avoid a head-on flash.
Flash freezes movement and copes with a long queue; continuous light lets you see what you're getting as you go. If you're torn, our piece on flash versus continuous lighting sets out the trade-offs.
Then light the wall, gently
If the backdrop needs its own light, top-mounted arm lights and floor-level uplighting can fill shadows and give it some depth. Avoid spotlights tucked close to the top edge — they leave hard bright patches across the logos.
Let distance even things out
Light drops off quickly with distance. Bring a light closer and the fall-off gets steeper; move it back and the light spreads more evenly. For groups, that means pulling the lights back a little so the person on the end isn't noticeably darker than the one in the middle. With a steady stream of guests, a handheld light meter gives you a consistent baseline instead of guesswork.
Where should guests, camera and lights go?
The layout is simple, and it works because it's repeatable. You want everyone on the same spot, every time.
| Element | Starting point |
|---|---|
| Camera distance from the wall | 2.4 to 3.7m (8 to 12 feet) |
| Camera height | About 1.5m (5 feet), chest to eye level |
| Guest step line | 1.2 to 1.5m (4 to 5 feet) in front of the wall |
| Lights | About 45 degrees to the wall, stands at roughly 2.1m |
These figures come from an event-production guide that also notes a camera at around 1.5m keeps perspective natural. Treat them as a sensible start and adjust to the room.
The step line matters more than people expect. Standing a metre or so off the fabric moves the guest out of their own shadow and lets the logos soften slightly, so the backdrop supports the picture rather than competing with it.
A simple routine for busy arrivals
- Tape a mark on the floor for guests.
- Mark the camera position too, so the photographer doesn't drift.
- Have a helper greet people, note names for captions and move groups on after a few frames.
- Shoot three or four frames per person — blinks are the most common reject.
If the wall is part of a bigger day, our event photography checklist covers the planning before, during and after, including the names list and shot order.
What camera settings and lens work best?
There's no magic setting, but there is a sensible lens. A 35mm or 50mm covers small groups without stretching the edges of the frame, on a DSLR or mirrorless body alike.
Beyond that it comes down to exposure — the balance of aperture, shutter speed and ISO. In practice:
- Aperture: a mid-range setting keeps every face in a group sharp while letting the backdrop soften a touch.
- Shutter speed: with flash, the flash does the freezing; without it, keep it fast enough to stop a wave.
- ISO: as low as the light allows. If you're pushing it, add light rather than live with the noise.
- Framing: make sure a logo survives the crop you expect, and shoot a little wider than feels necessary. Cropping is easy; adding fabric isn't.
- Files: full resolution, so the same image works for social, press and print.
How do you fix the common media wall problems?
The single most useful habit is to build the set-up and take test photos about two hours before doors open. Check exposure, glare, framing and whether the logos read, and mark the standing spot and camera line while you're at it.
| Problem | Likely cause | Fix |
|---|---|---|
| White patches on the wall | Glossy material or head-on flash | Matte tension fabric; move lights to an angle |
| Hot spot behind heads | Bright logo where heads fall | Leave a logo-light band above head height |
| Darker faces at the end of a group | Lights too close | Move the lights back for more even spread |
| Logos you can't read | Artwork too small for the distance | Scale logos to the shooting distance |
| Guests drifting out of position | No marked spot | Floor marks for guest and photographer |
| Shadows on the fabric | Guest standing too close to the wall | Use the step line |
How should the set-up change with the purpose?
Launches, awards and press nights
Expect volume. You need a wide wall, a clear flow, a names list and a quick edit, because press and social posts often go out the same evening. This is where a dedicated event photographer in Leeds earns their keep: someone whose only job is the wall, while you look after your guests.
Team portraits on a branded backdrop
A media wall isn't only for events. It works well for team portraits at an away day, where everyone gets a couple of minutes in front of a consistent background. Here the quality comes from patient light and a relaxed subject rather than speed — and don't worry about posing, that's our job. If you'd rather have individual portraits with more time each, our headshots in Leeds start at £95 for LinkedIn Express, with Quick-Fire Spotlight at £150 and In-Depth Portrait at £200.
Interviews, podcasts and brand video
A wall behind a speaker on camera needs different thinking: wide enough to avoid awkward crops, lit separately so the logo doesn't glow, and placed away from the noisiest part of the room. If you want controlled conditions instead of a busy venue, photography studio hire in Leeds at Dock Street starts from £125, with controlled lighting and a private space. For a wider look at backdrop styles, this comparison of photo booth backdrop types is a handy reference.
Frequently Asked Questions
Is a media wall the same as a step and repeat backdrop?
Usually, yes. Media wall, press wall, photo wall and step and repeat tend to describe the same stretch-fabric display. "Step and repeat" also refers to the repeating logo pattern and to guests stepping up one after another.
How far should the photographer stand from a media wall?
Start at about 2.4 to 3.7m (8 to 12 feet) from the wall, with the camera at roughly 1.5m high and guests standing 1.2 to 1.5m in front of the fabric. Then adjust for the size of the group and your lens.
What lens is best for media wall photography?
A 35mm or 50mm lens is a dependable choice. It fits small groups in without stretching the people at the edges, and keeps faces looking natural.
How do I stop glare on a media wall?
Use matte tension fabric rather than glossy vinyl, light from an angle rather than straight on, and keep a logo-light band where heads fall. Then take a test shot before anyone arrives.
Can we use a branded backdrop in your studio?
Yes. Photography studio hire at Dock Street starts from £125, with controlled lighting and a private space. Tell us what you're planning and we'll talk through the set-up and timings.
Where is the studio?
Dock Street Studio is at Unit 9, 30–38 Dock Street, Leeds LS10 1JF, in central Leeds near Leeds Dock. There's onsite parking, and it's a short walk from Leeds train station.
Plan your media wall photography in Leeds
Treat the wall as a small studio rather than a poster: light, distance, floor marks and flow. Send us your guest numbers, venue and timings and we'll talk it through properly over a brew. Book online, email mark@isophotographic.org, or call 0113 4400102.
Sources
- What is an Exhibition Media Wall?
- Fabric Pop-Up Displays London
- Step and Repeat Backdrop & Stand Kits
- What’s a Step and Repeat wall?
- Step-and-Repeat Backdrops for Events: Sizing, Materials
- Fabric Backdrops & SEG Printing London
- Formulate Straight Tension Fabric Backwall Display
- What Is a Media Wall? A Guide to Corporate Event Displays
- Step & Repeat Design Tips Photographers Appreciate
- Professional Guide to Step-and-Repeat Backdrops
- Best Media Wall: 7 Secrets to Avoid Event Mistakes
- Light Fall-Off in Photography
- Studio Lighting for Headshots: A Simple Guide
- Event Wall Photography for Step and Repeat backdrops
- RPS Licentiate Criteria & Guidance
- Photo Booth Backdrops for Planners
Written by Mark Wheelwright
Commercial photographer & studio owner, Leeds | ISO Photographic Ltd
Dock Street Studio, Unit 9, 30–38 Dock Street, Leeds LS10 1JF
18+ years' experience | 900+ projects | 300+ five-star reviews | 1M+ shutter count
dockstreetstudioleeds.co.uk
Shot, written and built by the Dock Street team
Every guide on this blog comes from the team at Dock Street Studio — Mark behind the camera with 18+ years' experience, Nicole on styling and lighting, Beya on video and bookings and Austin keeping the site fast and findable. If you'd rather have us do it than read about it, book a session or explore our photography services in Leeds.