


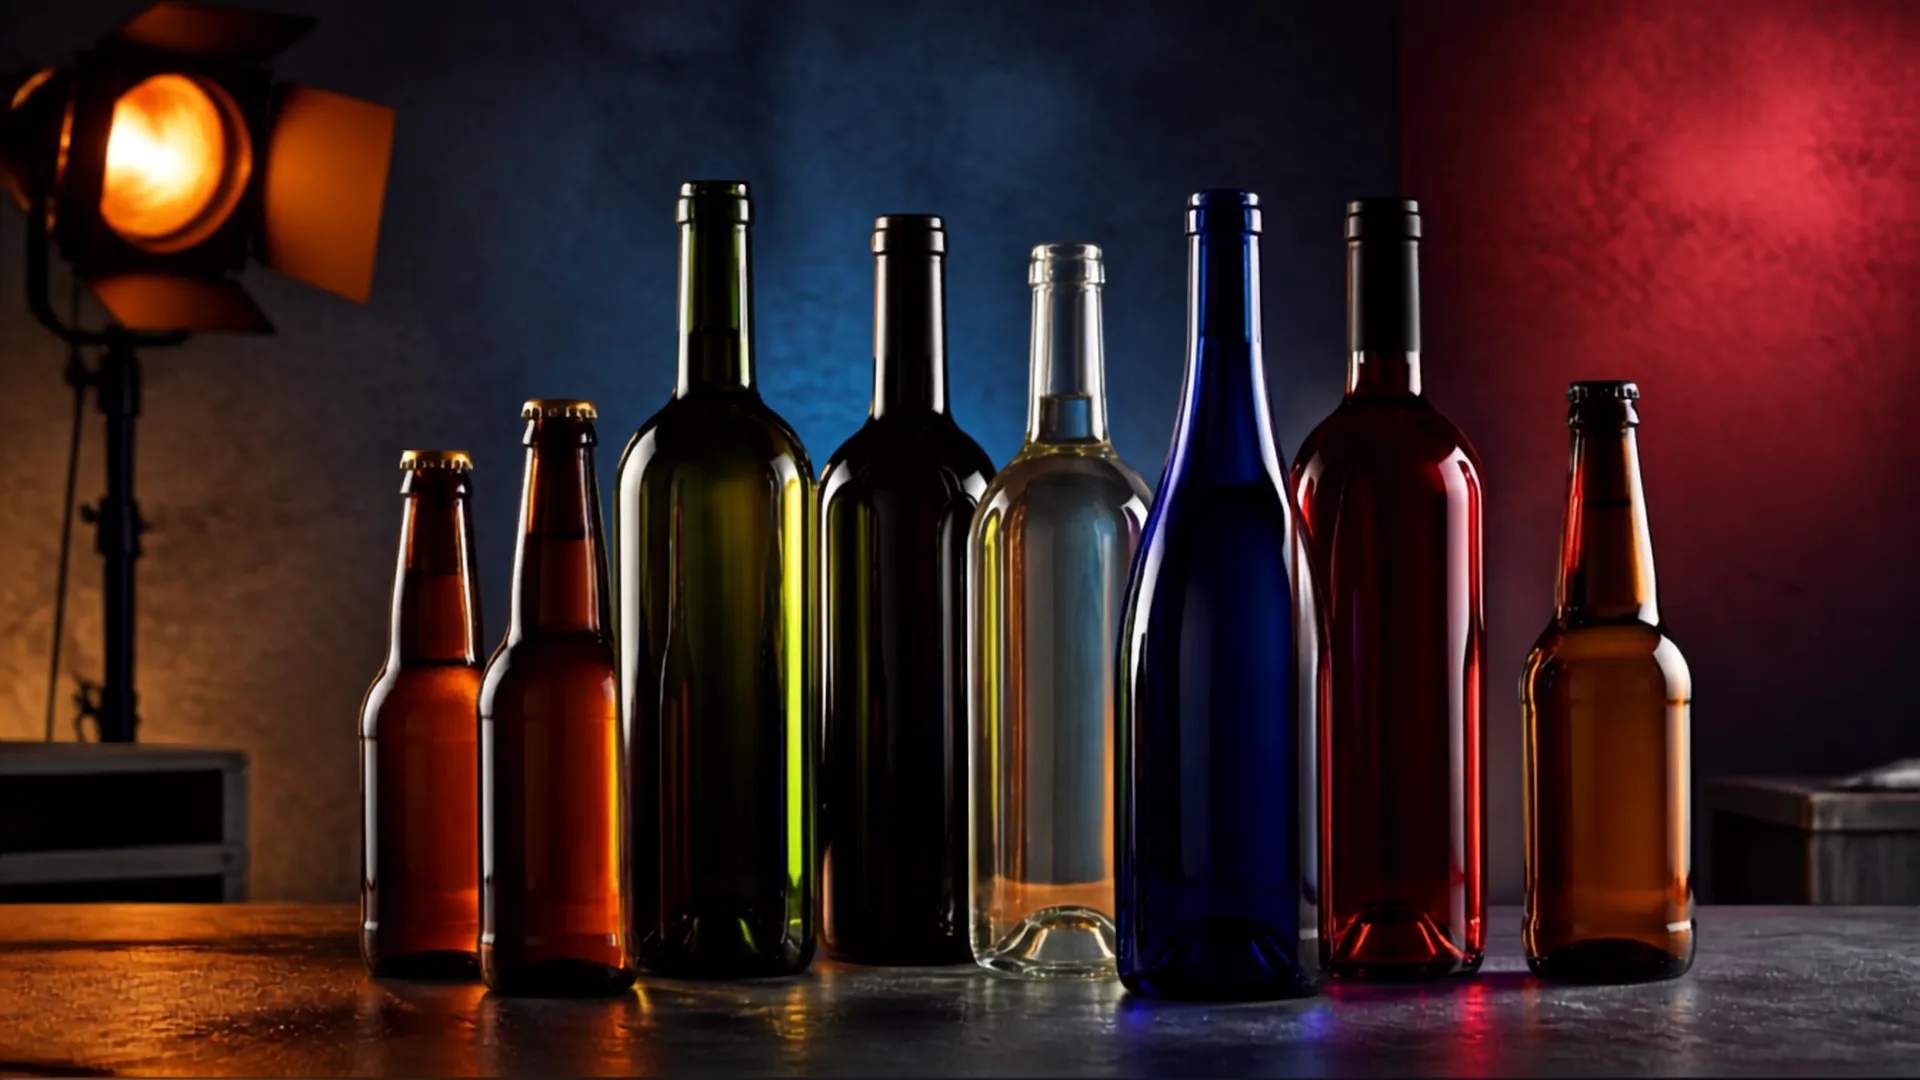
The reliable studio approach is a three-part lighting split: an edge or rim light to draw the glass shape, a dedicated head for the label, and a backlight to keep liquid looking like liquid rather than grey soup. Build each light one at a time so you always know which surface is producing which reflection. The kit is modest: a telephoto lens, a tripod, one to three lights, diffusion, and black and white cards for control.
TL;DR:
- Most commercial bottle photography requires a three-head lighting system, with additional lights used for complex cases like dark or metallic bottles.
- Control over reflections on label, cap, and liquid surfaces is achieved through specific light placement, negative fill, and diffusion, which are critical to realistic results.
- Using a short telephoto lens around 100mm at f/11 to f/14 and tethering the camera for focus checking ensures sharp, distortion-free images with consistent exposure across SKUs.
- Proper preparation, including inspecting bottles, cleaning thoroughly, and standardizing fill levels, prevents avoidable discrepancies and saves time in post-production.
- Booking a professional studio with preconfigured lighting and kit for multi-SKU shoots improves efficiency, consistency, and delivery speed over DIY setups.
Table of Contents
- Choosing your bottle photography setup: one, three or four lights
- Lighting breakdown: controlling reflections on label, cap and liquid
- Camera settings, lens choice and kit list for bottle shoots
- Preparing and styling bottles for consistent results
- Shooting workflow: building light and compositing the final shot
- Techniques for glass, plastic and frosted bottles
- A studio view on briefing, turnaround and when to hire
- Book a bottle or product shoot at Dock Street Studio
- Studio perspective: why plans beat gear on bottle shoots
- Sources
- FAQ
Choosing your bottle photography setup: one, three or four lights
Not every job needs a full three-head rig, but most commercial bottle work does. Here is how the options stack up.
- One light or a phone rig. Fine for quick social content, stock catalogue shots, or a single hero image against a plain background. You lose control over separating the label from the cap highlight, and dark glass tends to go flat.
- Three lights (the standard). A gridded head for the label, a strip box for the cap, and a strobe through diffusion behind the bottle for the liquid. This is the workhorse three-light approach most working studios default to for anything with visible liquid content.
- Four lights. Add a dedicated rim or negative fill light when you are shooting dark glass, heavily reflective metallic labels, or editorial work where the bottle needs to look sculptural rather than just documented.
- Scaling for multi-SKU catalogues. Once the three-light rig is dialled in on one bottle, you can often lock the setup and swap products, adjusting only the negative fill position for taller or wider bottles.
The jump from one light to three is where image quality changes most. The jump to four is about polish, not survival.
Lighting breakdown: controlling reflections on label, cap and liquid
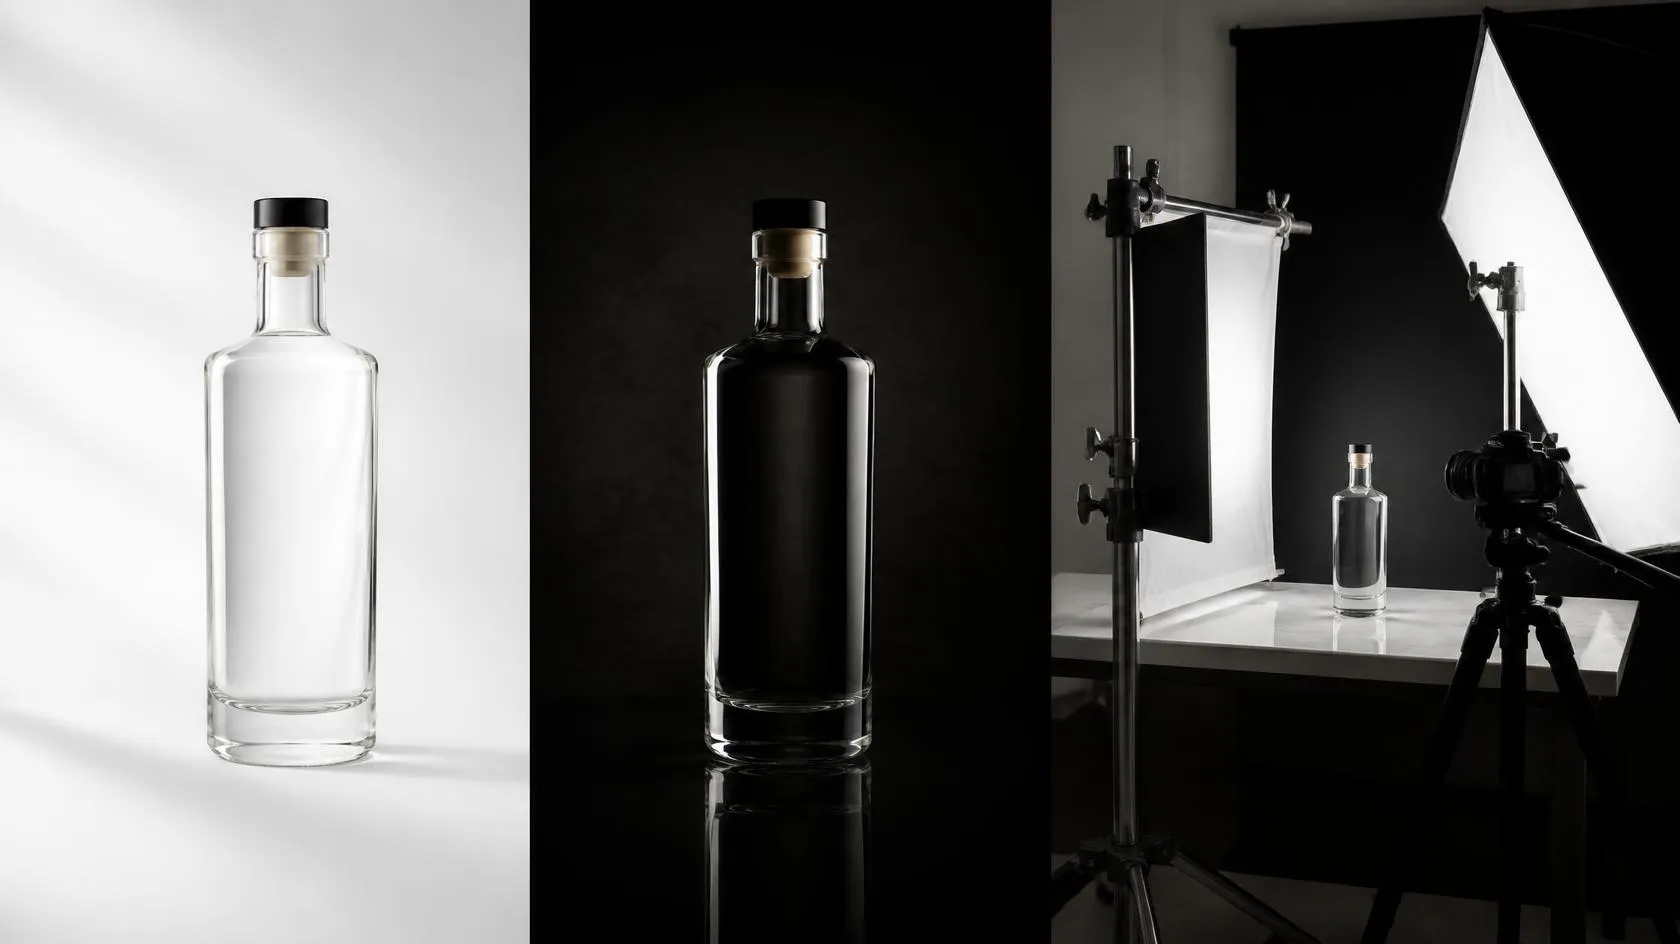
Bottle photography works because you’re lighting the surfaces the glass reflects, not the glass itself. A soft gradient falling off on one edge and a clean black edge on the other is what reads as “glass” to the eye, according to FoodShot AI’s breakdown of drinks photography. Get that gradient wrong and every other decision in the shoot becomes damage control.
Work through each surface separately:
- Label light. A gridded strobe placed high and angled down keeps the beam tight on the label and off the background, so you avoid unwanted spill lightening your backdrop.
- Cap and metal trim. An overhead strip box flatters foil caps and metal collars without blowing out the highlight, because the long, narrow shape of a strip box matches the curve of the cap better than a round head would.
- Liquid and body. Backlight through a translucent panel (translum or a sheet of acrylic) is what keeps clear spirits and coloured liquids looking saturated. A silver card bounced into the base of the bottle boosts that translucence further.
- Negative fill. Black cards or flags positioned close to the bottle’s edges are what create the deep, clean black lines that define its silhouette, a technique Outshinery’s glass photography guide treats as non-negotiable for avoiding a washed-out look.
- Source shape. Large, soft rectangular sources mimic the bottle’s own proportions and produce controllable highlights, whereas small round heads tend to leave an obvious hotspot rather than a gradient, as Amateur Photographer’s technique guide notes.
Pro Tip: Diffusion works best 20 to 30 centimetres from the panel, not jammed against it. Too close and you get a hard, defined edge to the highlight; back off and the gradient softens into something believable.
Dark bottles such as wine or stout rely almost entirely on those edge reflections, since there’s no liquid colour to backlight through. Clear bottles need the backlight or they photograph as a flat grey silhouette, a distinction worth building into your setup checklist before you even switch anything on.
Camera settings, lens choice and kit list for bottle shoots
A short telephoto, around 100mm on a full-frame body, is the standard recommendation because it avoids the barrel distortion a wide lens introduces on a tall, narrow subject, per Amateur Photographer’s guidance on bottle and glass photography. Shoot at f/11 to f/14 for enough depth of field to hold the label and cap sharp together, at your camera’s lowest native ISO, with flash set manually at sync speed. Shoot RAW and tether to a laptop so you can check focus on the label at full resolution rather than trusting the camera’s rear screen.
Essential kit:
- Strobes or speedlights, plus a rectangular softbox or strip box
- Diffusion panels (translum or a large sheet of white diffusion material)
- Black and white foam core for negative and positive fill
- Sturdy clamps, a locked tripod, a fine-mist atomiser, and nitrile gloves
Budget alternatives exist: continuous LED panels with barn doors give a similar shaping effect to strobes for static product work, and several phone-compatible mini softboxes now clip onto handset camera housings for smaller-scale content.
Preparing and styling bottles for consistent results
Preparing and styling bottles for consistent results is crucial, and a professional stylist’s role on shoots ensures styling, props, and consistency across SKUs are perfectly managed (What Does a Stylist Do on a Photo Shoot? | ANT Management).
Buy or pull more samples than you think you need. Labels ship crooked more often than you’d expect, and glass can carry scuffs invisible until it’s lit.
- Inspect every bottle for a skewed label, a chip, or a scratch before it goes near the set.
- Clean thoroughly with nitrile gloves, microfibre cloths, and a soft dust brush, working glass and label separately so grime from one doesn’t transfer to the other.
- Add condensation with a 50:50 mix of vegetable glycerine and water in a fine-mist atomiser, sprayed only on the “chilled” zone so the label stays dry, a recipe Rob Andrew’s bottle photography guide uses to keep droplets holding their shape under hot studio lights.
- Fix your rules and stick to them. Same fill level, same garnish or ice count, same droplet pattern across every bottle in the run.
- Shoot a darker exposure pass for foil and metallic elements before you move on, so you have detail to pull back in during retouching.
Shooting workflow: building light and compositing the final shot
Work through lights one at a time rather than switching everything on at once. Building sources sequentially is what lets you isolate exactly which head is producing which reflection, a discipline the Tether Tools step-by-step bottle photography guide treats as the backbone of a controlled set, rather than switching on a rim, then the label light, then the backlight, checking the tether after each addition.
A workable sequence:
- Shape the rim and negative fill first, with everything else off, and confirm the edge line is clean.
- Bring in the label light and check on the tethered screen that it sits straight and isn’t spilling onto the background.
- Add the backlight for the liquid, sampling colour against a grey card so the tint matches the real product.
- Bring in the cap light last, since it’s the easiest to overexpose if it’s fighting the other three.
Capturing several exposures for each zone, one for the label, one for the liquid, one for the cap, is standard practice rather than a shortcut. Rob Andrew’s guide to photographing glass bottles notes that most finished commercial bottle shots are composites for exactly this reason: it’s easier to nail one surface at a time than to fight all three in a single frame.
Pro Tip: Keep the tripod locked between every pass. If the frame shifts even slightly between the label exposure and the liquid exposure, your compositing mask will show a hairline ghost around the label edge that’s murder to clean up later.
For catalogue work, lock your composite template on the first bottle, then swap products through the same rig. It’s far faster than relighting from scratch for every SKU.
Techniques for glass, plastic and frosted bottles
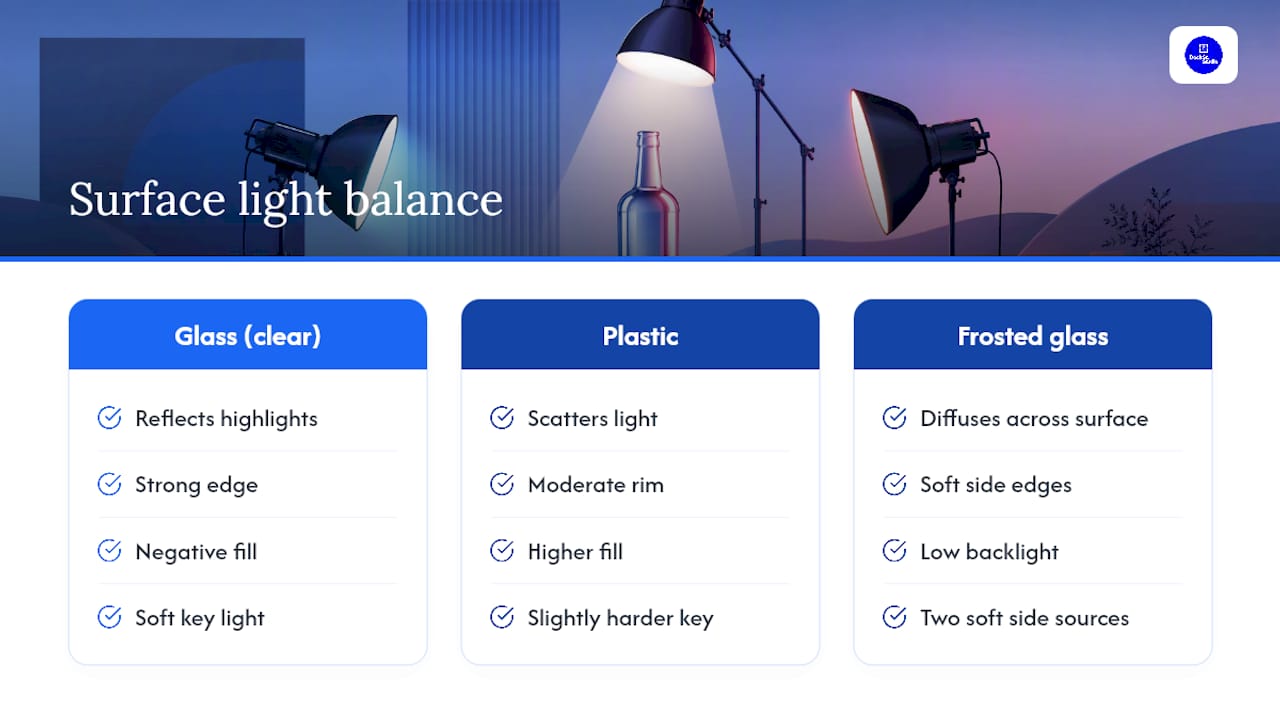
Clear glass is the classic case: it takes its shape almost entirely from what it reflects, which is why the edge-light and negative-fill routine above exists in the first place. Coloured or dark glass, think stout bottles or amber spirits, relies more heavily on those edge reflections since there’s less light passing through to backlight, so spend more time refining rim placement than chasing liquid glow.
Plastic bottles behave differently. They scatter light rather than reflecting it cleanly, which softens hotspots but can also flatten definition. A slightly harder key light than you’d use on glass, combined with a modest rim, tends to restore some shape without the plastic looking like styled cardboard.
Frosted or etched glass diffuses light across its whole surface, so a single strong backlight often washes it out to a flat pale grey. Two softer sources from either side, rather than one strong one from behind, usually reads more naturally and preserves the texture of the frosting itself.
Whichever material you’re working with, the underlying principle stays the same: identify what the surface does to light before you decide where to put your heads. Glass reflects, plastic scatters, and frosted surfaces diffuse. Each demands a different balance of edge light to fill.
A studio view on briefing, turnaround and when to hire
Most disappointing bottle shots trace back to weak planning rather than weak lighting, echoing what Visual Education’s guide to bottle product photography found when looking at recurring shoot problems. Before booking anywhere, lock down your SKU list, label artwork files, and exactly which deliverables and formats you need.
That’s where studio hire earns its keep. A controlled space with the right lighting for reflective products already set up, kit included, and a 48 hour retouch turnaround beats assembling a DIY rig when you’re facing a multi-SKU catalogue or tricky metallic labels on a deadline.
Book a bottle or product shoot at Dock Street Studio
Dock Street Studio is the alternative to building or hiring your own rig for bottle and product work in Leeds: you get the studio, the lighting kit, and a photographer who already knows how to shape a rim light and separate a liquid pass, without buying strip boxes and translum panels you’ll use twice a year. Before booking, pull together your sample bottles, label files, and a shortlist of the exact images you need, following a structure like our product photoshoot planning guide, so the session runs to schedule rather than drifting into unplanned setup time.
On shoot day, expect the space and lighting already configured for glass and liquid work, with retouched files generally delivered quickly. Commercial product photography starts from £450, and studio hire is available if you’d rather bring your own photographer. Check dates and get a quote through the booking page to lock in your slot.
Studio perspective: why plans beat gear on bottle shoots
Ask most photographers what went wrong with a bottle shot and they’ll blame the light. Ask a studio that shoots bottles every week and they’ll usually point at the brief that arrived without a shot list, or the sample bottle that turned up with a crooked label nobody flagged until it was on the tether screen.
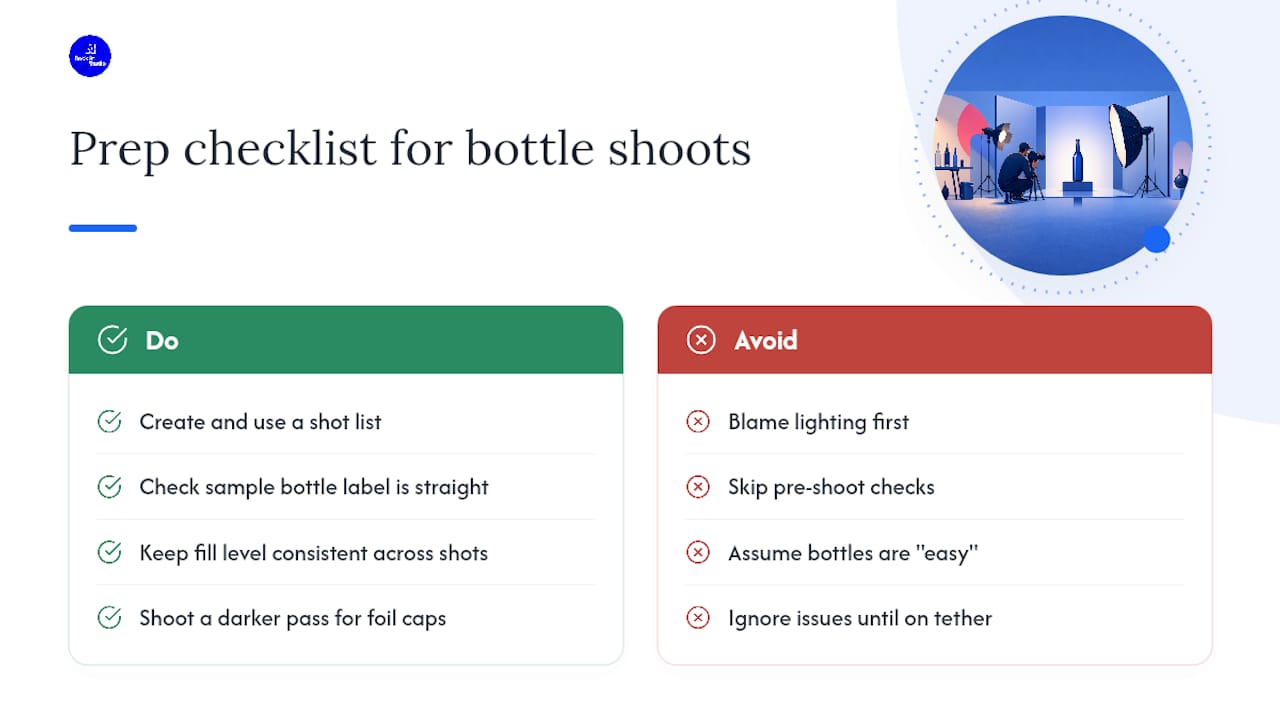
The lighting theory in this guide isn’t complicated. Rim, label, backlight, negative fill: four ideas any competent photographer can learn in an afternoon. What separates a forgettable bottle shot from a genuinely usable one is almost always the unglamorous stuff done before the first light gets switched on. Which sample bottle has the straightest label. Whether the fill level is consistent across twelve near-identical shots. Whether someone remembered to shoot a darker pass for the foil cap before moving on to the next SKU.
That’s the case for treating preparation as equal in weight to lighting craft, not a footnote to it. A studio that runs bottle shoots weekly builds these checks into muscle memory. A photographer doing it twice a year benefits from writing the checklist down and following it exactly, every single time, with no shortcuts for the “easy” bottles.
— Mark
Sources
- Bottle Photography: How to Shoot Drinks & RTD Products | FoodShot AI
- How to Photograph a Glass Bottle | Rob Andrew
- How to photograph bottles and glass products | Amateur Photographer
- Glass bottle photography without reflections | Outshinery
FAQ
What are some quick tips for taking better bottle photographs?
Build your lights one at a time, match your source shape to the bottle’s shape, use negative fill for clean black edges, shoot RAW at f/11 to f/14, and never skip inspecting the label for straightness before you shoot.
How do you shoot drink photography with visible liquid?
Backlight the bottle through a diffusion panel to keep the liquid saturated rather than grey, and consider a silver bounce card at the base to add translucence, since clear liquids photograph flat without a light source behind them.
How do you take a photograph of a bottle without reflections ruining the shot?
Use negative fill, black cards positioned close to the bottle’s edges, to create clean black lines rather than a milky wash, and keep your key sources large and soft so they don’t leave hard hotspots on the glass.
Should I hire a studio for a multi-SKU bottle shoot?
If you’re photographing several products against a deadline or dealing with metallic labels, studio hire with kit and lighting already configured, plus a fast retouch turnaround, is usually quicker and more consistent than building the setup yourself.
Recommended
Shot, written and built by the Dock Street team
Every guide on this blog comes from the team at Dock Street Studio — Mark behind the camera with 18+ years' experience, Nicole on styling and lighting, Beya on video and bookings and Austin keeping the site fast and findable. If you'd rather have us do it than read about it, book a session or explore our photography services in Leeds.